
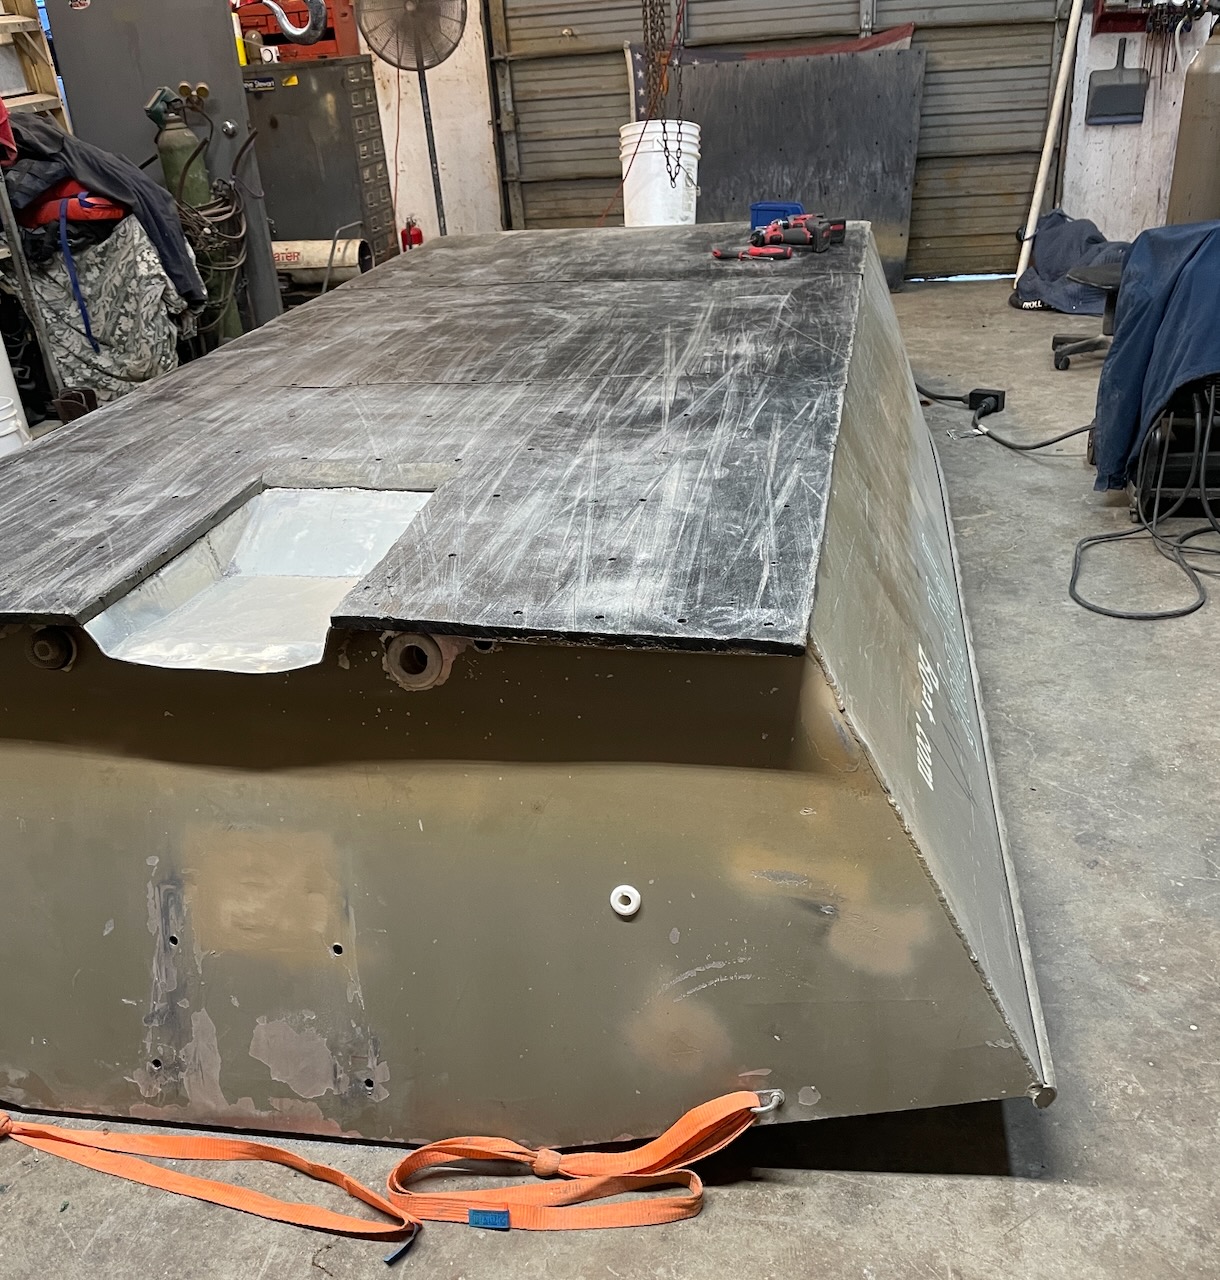
A jet tunnel is one of the most useful features you can put in an aluminum outboard jet boat, especially if you run shallow, rocky rivers.
The tunnel lets the jet intake sit higher than it would on a standard hull. That gives the intake more protection, helps the boat get moving in shallower water, and lowers the chances of ending a trip with a busted intake.
There is some bad information out there about jet tunnels. A lot of it comes from boats with poorly mounted engines, not from a problem with the tunnel itself. When the tunnel is designed correctly and the outboard is mounted at the right height, the advantages are hard to ignore.
What Is a Jet Tunnel?
A jet tunnel is a short, narrow ramp built into the stern of the boat. It directs water upward toward the jet intake, allowing the intake to sit above the lowest point of the hull.
Tunnel Size and Shape Matter
A properly designed tunnel is only about two to three inches deep, depending on the deadrise at the stern. It should be just tall enough to protect the intake without removing more flotation than necessary.
The tunnel also needs to be wide enough to feed the pump when the outboard is turned in either direction. The intake shoe must remain inside the tunnel opening through the full steering range. If the tunnel is too narrow, the pump may lose water and cavitate during turns.
The tunnel should be short. It should never be more than about two feet long, and most good tunnels are considerably shorter. Making one longer or deeper does not automatically make the boat run shallower. It usually costs performance and static flotation without providing any real benefit.
The tunnel should also level off before it exits the hull. You want clean water feeding the intake, not an abrupt shape that disrupts the flow.
Of the tunnels I have personally experienced, the Wooldridge design gets everything right. It is tall enough to work without giving up too much static flotation, and it is wide enough to feed the jet properly at all steering angles.
Protecting the Intake
From my point of view, the main purpose of a jet tunnel is protecting the intake.
When running over rocky shoals, it is easy to smack the intake on a rock. I have seen stock cast-aluminum intakes busted into pieces this way. Once that happens, you usually are not limping back to the ramp. The intake is often damaged badly enough that the pump will no longer function.
A tunnel usually allows the outboard jet intake to sit two or three inches higher than it would on a non-tunnel hull. Those few inches matter when you are trying to skip over rocks in very shallow water.
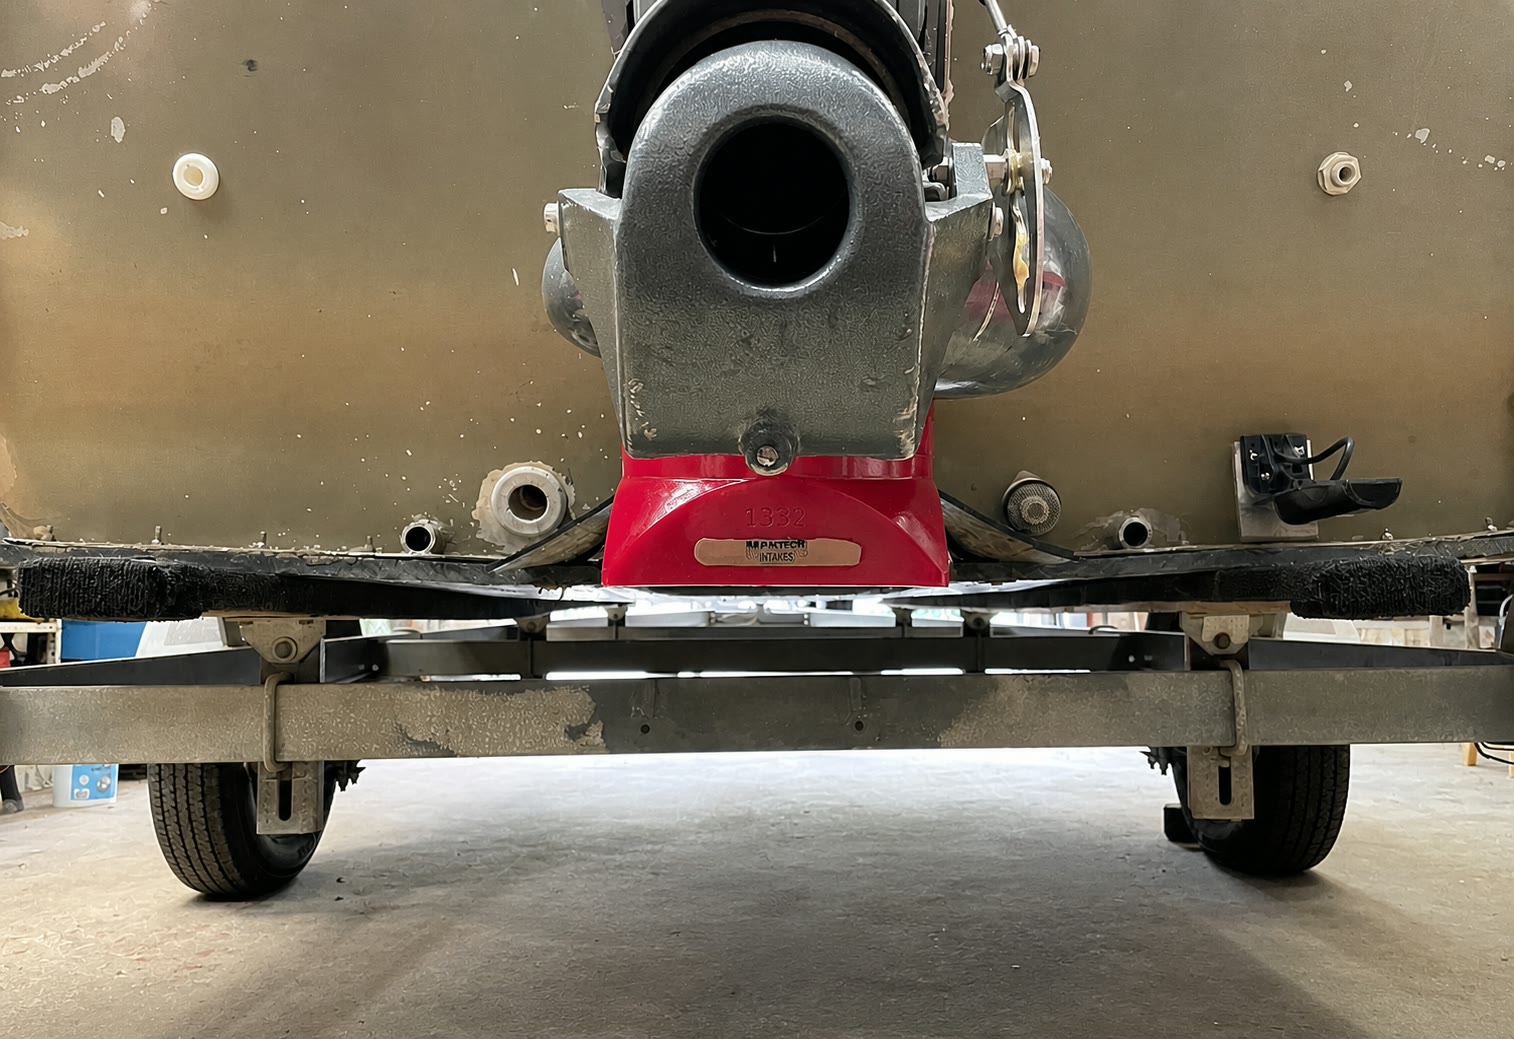
A tunnel does not make the intake indestructible. It gets the intake farther out of harm’s way.
I also recommend replacing the stock cast intake with a more durable poly intake for rocky rivers. The tunnel and poly intake solve different parts of the same problem. The tunnel raises the intake, while the poly intake is better able to survive an impact.
Powering Up in Less Water
The second major advantage is the ability to power up in less water.
As a fishing guide, I see the value of this during the low-water months. A tunnel hull lets me drift farther into shallow water before I need to power up and get out.
With my non-tunnel inboard and outboard jet boats, I had to be in deeper water before taking off. Otherwise, the pump could immediately pick up rocks, gravel, grass, or other debris and leave me dead in the water.
Both tunnel and non-tunnel jet boats can run shallow once they are on plane. The difference is how exposed the intake is and how much water the boat needs when starting. A tunnel gives you more room for error during that transition.
It can also help in submerged grass because the intake is not hanging as far below the hull. It will not prevent every clog, but it reduces how exposed the intake is.
Engine Mounting Height Is Critical
Most problems blamed on jet tunnels are actually caused by incorrect engine mounting height.
Getting the intake high enough is especially important on a tunnel hull. When the outboard shaft is perpendicular to the surface of the water, the front pin that holds the intake grate bars should be exactly level with the top of the tunnel.
The intake should not be tucked completely inside the tunnel. The tunnel needs to feed water cleanly into the intake while still leaving the intake positioned correctly behind the hull.
Mounting height deserves its own full explanation. The important point here is that a good tunnel cannot make up for an outboard mounted at the wrong height.
Intake Fins Are Mandatory on a Tunnel Hull
On an outboard jet with a tunnel, I consider intake fins mandatory.
The fins mount to the sides of the jet intake. They help force water upward into the pump and greatly reduce cavitation. The best way I can describe it is that they grip the water.
A tunnel changes how water reaches the intake. The fins help keep that water directed into the pump, particularly during turns. Without them, the pump is more likely to lose its clean supply of water.
Splash Guard
The splash guard is a separate part bolted around the outboard jet intake at the tunnel opening.
This view from underneath shows the outboard jet intake set within the tunnel opening, with the splash guard fitted around it.
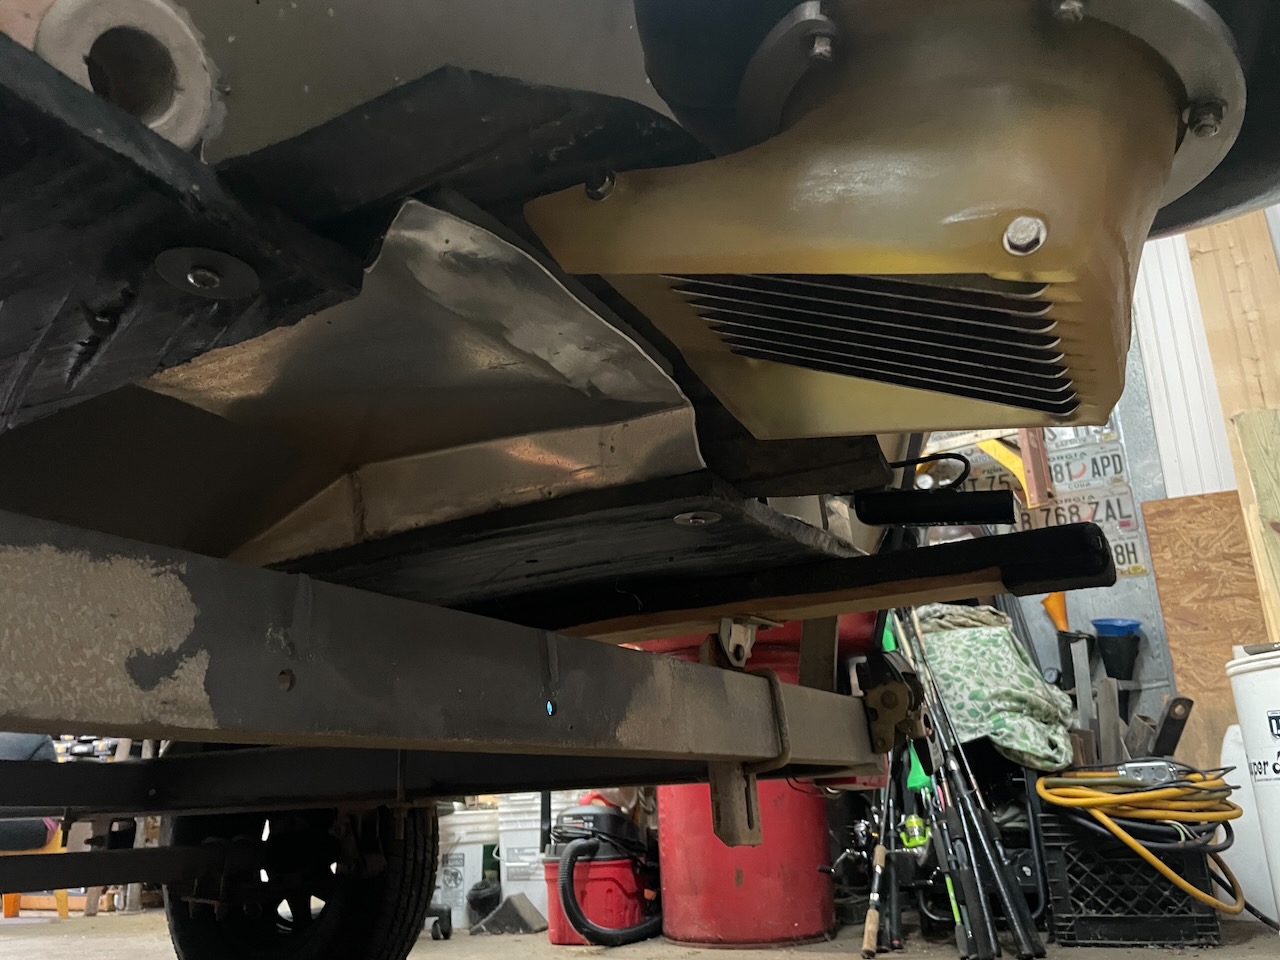
The splash guard should surround the intake closely enough to stop water from splashing upward, hitting the jet pump, and then being blasted back down in front of the intake. That disturbed, aerated water can cause cavitation.
A correctly shaped splash guard also cuts down on the amount of spray entering the boat. It should be able to work with the outboard’s trim movement rather than interfering with it.
Here is an example of what can happen without a splash guard. Water can come up around the jet and fill the rear of the boat with water.
One additional advantage of the tunnel is that it provides a good mounting surface for the splash guard.
Cavitation in Turns
A tunnel hull can be more likely to cavitate during hard, high-speed turns than a comparable non-tunnel hull. When the boat is pushed into a tight turn, especially at higher speeds, the pump may begin to lose its clean supply of water.
If the turn is pushed farther, the pump can lose suction.
That is why tunnel width, engine height, intake fins, and the splash guard all matter. The tunnel must feed the intake throughout the steering range, and the rigging must keep aerated water away from the pump.
If a tunnel hull boat is cavitating badly in ordinary turns, do not immediately assume the tunnel is the problem. Check the outboard mounting height, intake position, fins, and splash guard first.
Reverse and Static Flotation
Reverse still works normally with a properly designed jet tunnel. I have not experienced any meaningful loss of reverse propulsion because of the tunnel.
There is no reason to accept poor reverse performance as a normal tunnel-hull tradeoff. If the boat has a serious problem in reverse, look at the jet setup and rigging.
A tunnel removes some hull volume, so there will be a small loss of static flotation at the stern.
With a properly sized tunnel, the drop is noticeable but not terrible. In my experience, the ability to skip over rocks while keeping the intake higher outweighs the small loss of flotation.
This is another reason not to build the tunnel deeper, wider, or longer than necessary. More tunnel is not necessarily better.
Where a Jet Tunnel Makes Sense
Rivers are diverse. Some are mostly sand and mud. Others have exposed rocks everywhere.
Many eastern rivers are extremely shallow and rocky. Moving west, some rivers become sandier, while places such as Alaska can give you just about everything: rocks, sand, saltwater, and even moose.
My experience is centered on rocky, treacherous rivers such as the Susquehanna. We build boats to get people from Point A to Point B and back. Intake protection matters more to me than squeezing out a little more speed.
If you run a sandy river, flooded fields, or consistently deep water and have never damaged an intake, you may not need a tunnel. If you regularly run rocky shoals and have broken shoes, damaged intake grates, or dented the bottom of your boat, a jet tunnel starts making a lot of sense.
Adding a Tunnel to an Existing Boat
Installing a tunnel in a completed aluminum boat is a major undertaking. It requires cutting into the hull, fabricating the tunnel, welding it into place, and making sure the finished shape feeds the intake correctly.
This is not a good place to guess.
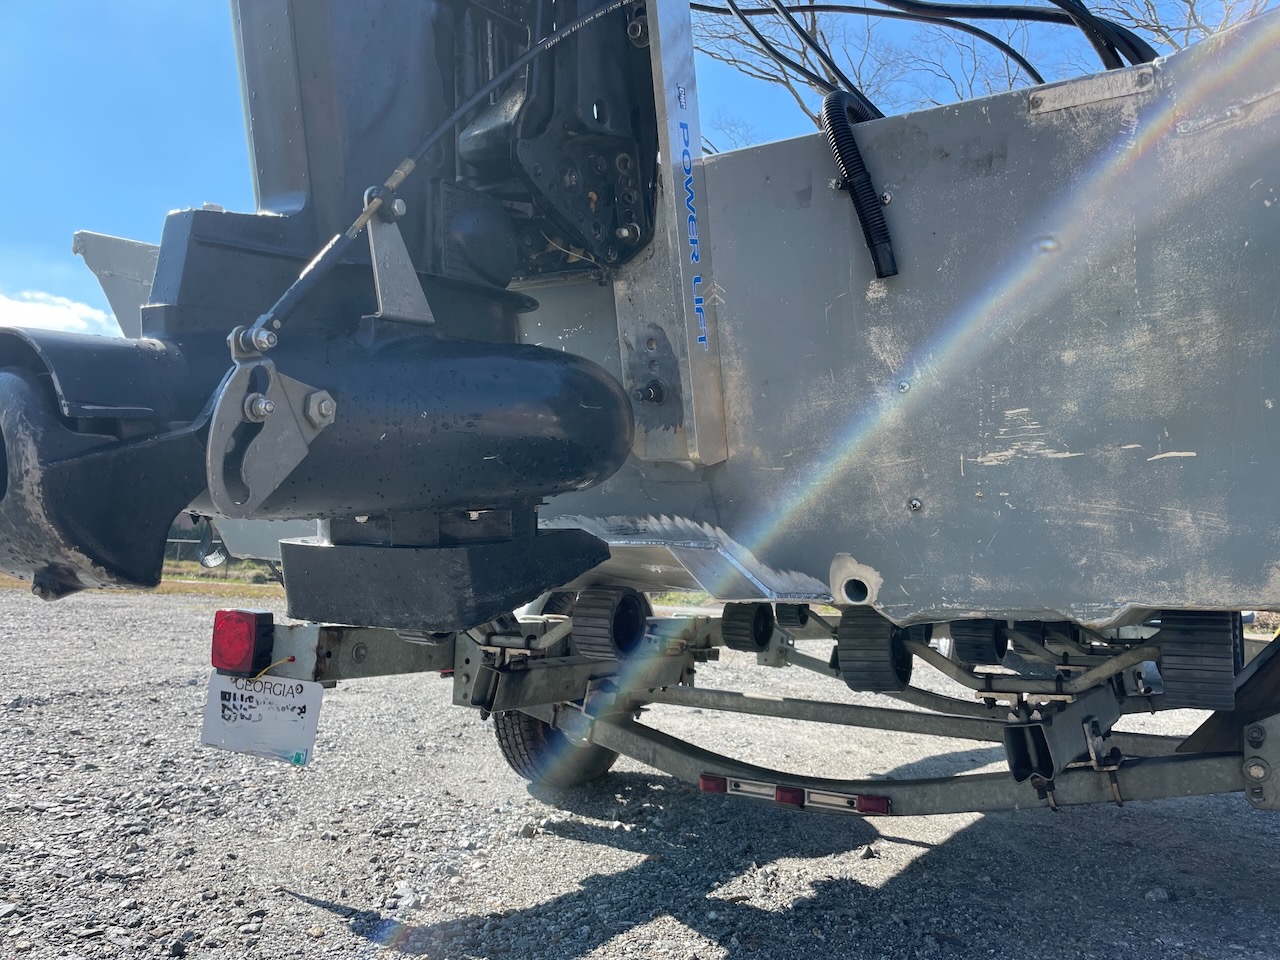
I have used the exact dimensions in Outboard Jets’ Tunnel Information document on an 1860 SeaArk MV, and it worked great. It is a useful reference to study before cutting a hull.
Here is that tunnel installed on the 1860 SeaArk MV. It gives a good look at the finished tunnel shape, splash guard, and how the outboard jet fits behind the hull.
Before cutting a hull, you need to know:
- The required tunnel width through the outboard’s full steering range
- The minimum tunnel depth needed for that hull
- The correct tunnel length and taper
- Where the tunnel must level off
- The correct engine mounting height
- How the splash guard will mount around the intake
- How much hull volume and static flotation will be lost
At minimum, checking the finished setup requires a straightedge, level, measuring tape, and a way to hold the outboard perpendicular while measuring the intake position. The aluminum work itself requires proper cutting, forming, fitting, and welding equipment.
A poorly installed tunnel is difficult and expensive to correct. If the boat was not originally built for one, this is a job for somebody with actual experience building and rigging outboard-jet tunnel hulls.
Is a Jet Tunnel Worth It?
For a rocky, shallow river boat, yes.
A good tunnel raises the intake, protects vulnerable jet parts, and allows the boat to power up in less water. There is a slight loss of static flotation and an increased possibility of cavitation if the boat is designed or rigged incorrectly.
Those tradeoffs are manageable. A shattered cast-aluminum intake that leaves you stranded usually is not.
The tunnel needs to be properly designed. The outboard needs to be mounted at the correct height. Intake fins and a correctly fitted splash guard are part of the setup, not optional extras.
When all of those parts work together, a jet tunnel does exactly what I want it to do: help the boat get through shallow, rocky water and bring everybody back to the ramp.